A Guide to Pruning
/in Articles, Gardening, Hedging and Pruning/by infotechA Guide To Pruning New Zealand Native Plants

Native New Zealand plants are delightful to have in your garden nevertheless they are not maintenance free. While the majority of New Zealand plants need less care than many exotic plants, they do profit greatly from some fertilizing, pruning and watering. Pruning promotes a healthy growth, extends the life of short lived plants and enhances a grander display of flowers.
In this Jim’s Mowing blog, you’ll learn:
- The Types of Pruning
- When to Prune
- How to Maintain Pruning Tools
Types of Pruning
Tip Pruning
To promote lateral growth and therefore bushier plants, regular tip pruning of the soft new growth is favoured over infrequent hard pruning and should be initiated when plants are very young, desirably at seedling or rooted cutting stage. Tip pruning is best commenced after flowering and during the growing season for faster outcomes. Pruning too late in the season bares the risk of decreasing the next season’s flowers. Constantly carry secateurs when you’re out and about in the garden as this allows you to effortlessly practice tip pruning.
Universal Pruning
When pruning to regulate unwanted growth, it is better to only make clean cuts that slope away from buds. Cut close and parallel to existing branches and leaf nodes, but not level with them.
With large branches, first cut the bark below, then make the top cut, this prevents tearing of the bark as the branch falls away.
Use the plant’s natural habit as a guide. If it is slow-growing, compact and well-shaped, then only light pruning is required to tidy it
up. If it is fast growing, then further pinching-out or pruning should be carried out. Prune the whole shrub all at once, that way even growth will ensue all over the plant.
It is best not to prune in winter as the resulting new growth can easily be damaged by cold temperatures. When cutting into plants that flower on old wood such as many Leptospermums, Melaleucas and Hakeas, be conscious that you may lose next year’s flowers.
Pruning Screen and Hedge Plants

Successful screen and hedge plants need to be given consistent but relatively delicate pruning all over to encourage and preserve dense growth. If you are using this type of pruning for Lilly pillies such as: Syzygium smithii and various forms, it will keep them bushy to the ground.
Pruning to Mend Damage
When branches are broken or attacked by insects and/or borers, the branch should be pruned back to clean unspoiled wood and close to a limb or leaf node. If left in a damaged state, branches are prone to infection and dying back.
Pruning to Improve Blossoming
Elimination of old flowers should be commenced after the flower is finished. This way the plant does not put its vitality into producing seed. It also has the same effect as tip pruning as it enhances new lateral growth and hence more flowers next season. Callistemons, and fine-leaved Melaleucas definitely benefit from having the top two thirds of their flowers detached and is an essential pruning action.
Pruning to Decrease New Growth
Pruning flush with the trunk should result in no new leaf growth. This is ideal if you are pruning lower branches off a shrub to make it more tree like.
Pruning When Direr Outcomes Are Needed
Trying to keep bulky plants to a convenient size by pruning is hard work and is best done frequently through-out the year. Be aware that hard pruning into old wood may possibly kill some plants. If you have any old woody shrubs that are more of a monstrosity than an asset in the garden, arm yourself with secateurs and a pruning saw and practice on it.
The simplest way to invigorate Callistemons, fine leaved Melaleucas and Leptospermums is to lop them off at ground level. If carried out in spring they will rapidly put out new shoots and grow into bushy shrubs with striking healthy foliage. Water well to maximise new growth. Radical pruning of older more senile Grevillea
s is not always successful. If the plant has gotten to the point where you have nothing to lose, prune hard and see what happens.
When pruning large weighty branches, make the initial cut about 150 mm further out than where you need to make the final cut. When the heavy branch has been removed, make an additional cut to clean up, this minimises tearing of the bark. Note that untidy cuts or torn bark can create entry points of fungal diseases and other such hazardous elements.
Maintaining Your Pruning Tools
Be sure to use sharp tools and disinfect them by scrubbing with methylated spirits. Blunted tools leave ragged edges on the branch and are an invitation for disease to attack your plants.
Don’t have the required tools or enough time? You can always take the hassle out of pruning and give Jim’s Mowing a call on 0800 454 654 or book online for a free, no obligation quote!
Cleaning Your Gutters
/in Articles, Gutter Cleaning/by infotechCleaning Your Gutters – A Guide
Severe weather events—from flash flooding and large hail to heavy rainfall—are becoming increasingly common across New Zealand and Australia. The damage from these storms can be widespread and costly. One of the simplest and most vital steps you can take to prevent expensive water damage is ensuring your gutters are cleaned regularly. A blocked gutter system simply cannot handle the extreme water load delivered by a major storm.
In this blog, you’ll learn:
- Why consistent maintenance is the key to preventing major damage.
- The most common reasons why gutters overflow.
- How to safely and effectively clear clogs by hand or with a power washer.
- Valuable long-term investments like gutter guards.
Part 1: Why Clean Gutters are Critical
Prevention and maintenance can abolish most common causes of clogged and overflowing gutters. Consistent cleaning, as well as regular trimming of trees that overhang your roof, are critical steps in protecting your home’s structure.
The Dangers of Neglect
Gutter cleaning is an imperative part of home maintenance. If you don’t keep your gutters clean, they will soon pile up with leaves and other debris that prevent water from appropriately draining from your roof. This leads to a chain reaction of problems:
- Rotted Wood and Fascia:
Overflowing water constantly drenches the wooden eaves and fascia boards, leading to rot and structural failure.
- Foundation Damage
Water pooling near the foundation can cause settlement issues and even basement flooding.
- Pest Infestations
Gutters filled with damp organic debris are an ideal home for nesting rodents, mosquitoes, and insects.
- Sagging Gutters
The sheer weight of debris, standing water, and mud can cause the gutters to bend, pull away from the roofline, and eventually collapse.
It is generally a good idea to clean out your gutters a minimum of twice a year, typically once in late autumn after leaf fall and again in late spring to prepare for summer downpours.
Common Causes of Overflowing Gutters
There could be any number of reasons why your gutters are overflowing, even after a recent storm.
Physical Blockages
The most obvious cause is the accumulation of leaves, nuts, and sticks.
Incorrect Slope
The angle of your gutters to the downpipes may not be steep enough to allow the water to move freely. If water pools rather than drains, you will need to reposition the gutters slightly higher at the end furthest away from the downpipe.
Clogged Downpipes
Debris can often bypass the gutter and cause a clog lower down in the downpipe itself.
- Inadequate System – In the case of older or recently-renovated properties, the roof drainage system may simply not have enough downpipes to handle the roof size and the high volume of water typical in modern severe storms.
Addressing Existing Water Damage
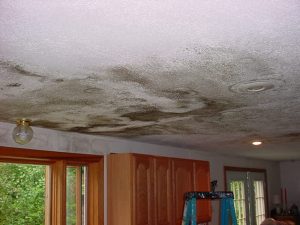
The water may have already caused some damage by the time you notice you have a problem, especially if it has flooded under the roof. The first thing to do when you notice a congested gutter is to check the roof and ceilings nearby for any signs of water damage. This can be costly and difficult to repair if it travels too far. If the water has not entered the roof, you can often fix your overflowing gutters quickly and easily.
Under-engineered Drainage
An overworked roof drainage system, commonly caused by an inadequate number of downpipes for the roof size, can be amended by adding more downpipes. You might want to consult a professional if you go down this road, as they will assist you in calculating important factors such as slope, load, and positioning.
Part 2: How to Clean and Protect Your System
Cleaning Your Gutters Safely
Since working at height is inherently dangerous, proper safety precautions must be taken. Never work on a ladder alone.
- Pull out Debris by Hand
If power washing is not an option or you have too much clutter, you will need to pull out the debris by hand. It is sensible to wear thick work gloves or rubber gloves to protect yourself from sharp objects, mould, and harmful insects. Put all the debris you pull out into a green waste bin so you do not have to clean it up from the ground later.
- Rinse the Gutters with a Hose
Once the bulk of the debris is out, you should be able to wash the remaining residue out with a hose.
- Check Flow
Watch how the water flows once you start rinsing. It should come out of the downpipe freely. If not, you may have to use a small brush on a wire or a plumbing snake to push out any remaining debris clogging the system.
- Check Pooling
Rinsing your gutters will also let you see if there are any areas where the water may pool up rather than drain. If you see persistent pooling, you may need to replace or re-slope that section of your guttering, as pooling will cause premature wear and corrosion.
- Power Wash If Appropriate
If your gutters are still in good shape structurally, you may be able to power wash them for cleaning. This involves using a high-pressure washer, also known as a gurney. Power washing saves you from having to pull out debris by hand, but it is not wise to try on older gutters that are weak or bent. The pressure from the water may cause the gutters to fall if they are not securely fastened.
- Avoid Clogging
If you choose to power wash, circumvent forcing all the debris down the downpipe. Instead, try to push it over the edge of the gutters and onto the ground for you to rake up later. A cluttered downpipe can be a giant headache to mess with.
Long-Term Protection: Gutter Guards
Gutter guards are essential caps that go over your gutters to minimise debris clogging. They are a valuable investment, particularly in heavily treed areas.
- Function
These guards feature slight slits, meshes, or holes that let water pass through while stopping leaves, nuts, branches, and other nuisances from piling up in your guttering.
- Recommendation
If you have a relatively new guttering system or plan on installing new gutters in the future, go the extra mile and invest in a quality gutter guard system for your home. This will minimise the work you have to do later on.
Professional Gutter Cleaning Services
Gutter cleaning is a dirty, dangerous job that involves heights and heavy lifting. We all know someone who has taken a nasty fall off a ladder with severe consequences. Do not risk your safety.
If you want the job done properly, safely, and efficiently, the Jim’s Mowing team is here to help. Our professionals have the right equipment and experience to clear your gutters without risk to you or your home.
Conclusion
Regular gutter maintenance is one of the cheapest and most effective forms of home insurance you can invest in. By ensuring your system is clean, properly sloped, and free of blockages, you protect your roof, fascia, and foundation from costly storm damage. Remember the key steps: clean twice a year, check the flow, and install protection where needed.
Don’t hesitate to call Jim’s Mowing on 0800 454 654 or book online and we’ll happily clean the gutters for you!
Adding a Splash of Colour to Your Garden
/in Articles, Gardening/by infotechIf your garden is looking a little dull, here are some great tips that will really stimulate your senses. Adding colour to your garden creates a
visual oasis that separates one’s thoughts from everyday stresses. If you want to see colour on a lavish scale, there is a smorgasbord of bedding plants available including mixing new varieties with old favourites.
Bedding displays have been popular since the Victorian era, when striking colours and intricate patterns became a fashionable part of high-style horticulture. With a contemporary layout and the right components, you can achieve an overriding sense of colour, scents and fun in your garden.
One of the challenges in creating mass displays is avoiding repetition therefor it is recommended to use common plants in uncommon ways. Dusty Miller (Centaurea cineraria) is as oldie but goodie, and can be grown as a column for a unique visual effect.
Planting Cineraria (Pericallis) at the base of the column can really set it off visually. Cineraria (Pericallis), a very familiar plant, can take on a life of its own when mass-planted.
Ornamental cabbages (Ornamental Cabbage – Brassica oleracea) are a fantastic as a form of display as they are beautifully detailed and also edible. When you are using plants like these ornamental cabbages, one of the things to avoid is the ‘hundreds and thousands’ effect. By separating colours into distinct bands and mass-planting them, you can really heighten the difference between the diverse varieties.
Nemesia is a stunning flower which comes in a variety of colours and only requires free drainage and a frost-free climate to grow. This plant is great for bringing bees to the garden, but is unfortunately not used very often.
Scent is also an important factor to consider when decorating your garden, every individual gardener will have their own preference, but the Matthiola often cultivated for its heavy scent and variety of colours.
Your garden is like a blank canvas waiting for you to add the colour, all you need to do is decide what colours you want and where to display them. For a smooth and subtle effect, you could combine pastels with other plants that have strong primary colours.
The next step is adding features to your garden, for example, a large ornamental cask that can be planted with Violas giving the impression that it is full to the brim with paint and is spilling over. Adding features does not have to be expensive, you can use old wheelbarrows, tyres, pallets, basically anything you can imagine.
It’s not just annual flowers that can generate a great effect in a bedding display, you can also include many different perennials. It’s imperative to know your garden’s microclimate. Primulas (Poison Primrose – Primula obconica) tend to last longer if they get less than six hours of sunshine.
By contrast, another bed might be warm, sunny and dry which is a perfect place to grow succulents, for example, Kalanchoe which is very rarely grown as a bedding plant, but great to work with as it is very enduring and needs very little water or care. At the end of their display, you can break off individual leaves and propagate them in potting mix to grow new plants.
Happy planning and planting! And remember, if you need any help in designing, planting or maintaining your garden, call your local Jim’s Mowing team on 0800 454 654 or book online for a free quote! We’d be happy to help.

Nemesia

Ornamental Cabbages

Cineraria

Dusty Miller

Matthiola Incana

Wheelbarrow Planter Box

Matthiola Regal White

Primulas

Violas planted in Cask

Kalanchoe succulents

Flower covered car
Overcoming the Challenges of Gardening by the Seaside
/in Articles, Gardening/by infotechYou wake up greeted by a stunning view and are lulled to sleep by the gentle sound the sea makes when it caresses the beach. Is it too much to ask for a blooming garden?

Almost all coastal property owners will tell you that gardening is like a losing battle. Simply put, the elements that make a coastal property appealing are the same elements that make seaside gardening difficult. You’ve got to deal with sandy soil, a huge amount of salt and heat, and onshore winds.
These elements combined can burn leaves and inhibit the growth of plants. But rather than accepting and being resigned to your fate as a shoreline property dweller, you can take a few steps in order to make your dream of having a beautiful coastal garden come true. The key here is to find suitable plants and make do with the available conditions.
One of the first things that you need to deal with is the soil quality. For example, if you live along Perth’s coastal area, it is highly likely that the soil on your property is more alkaline.
This requires improving soil quality through the addition of both organic matter and wetting agents. These will improve the structure of the soil as well as its capacity to hold water.
In adding organic matter, make sure that you dig this into the ground instead of simply spreading it on top of the soil. This will help prevent the growth of weeds.
It is also advisable to apply a thick layer of mulch at least once a year in order to contain evaporation and serve as a cushion for the ground against the wind.
And speaking of winds, you have to minimise the effects of these on the growth of your plants. The best way to do that would be to create windbreaks by using strategically positioned trees and shrubs around the garden.
In building windbreaks, you can try to combine trees and shrubs with any material you have on your property. You may also use fences and screens, but be sure to leave a gap to prevent turbulence. Keep the harsh wind and intense sunlight away from your plants.
When it comes to selecting plants for your coastal gardens, opt for native plants instead of having a lawn and a garden of flowering plants. Native plants can easily handle the conditions in your area and can provide both food and home for local birds and animals. Plus, these plants are more tolerant to drought and require little water.
For professional assistance with your garden planning and design, planting and maintenance, please don’t hesitate to call Jim’s Mowing & Gardening on 0800 454 654 or book online today!
Tips for Beautiful Roses
/in Articles, Gardening, Hedging and Pruning/by infotechThe reward for gaining and applying the relevant knowledge about rose gardening is big, beautiful rose bushes, laden with colourful and fragrant blooms. Many beginner gardeners are intimidated by roses, but with the right foundational knowledge about pruning, watering, and feeding, you can ensure your plants thrive.
In this Jim’s Mowing blog, you’ll learn:
- The different types of roses and how to choose the right one for your garden.
- Essential planting and watering requirements to prevent common fungal diseases.
- The best way to prune and prepare your roses for winter dormancy.
- Simple methods for managing common rose pests and diseases.
Choosing and Planting Your Roses

Types of Roses
The types of rose bushes you can choose from are extensive, including Shrub Roses, Miniature Roses , Climber, Grandiflora, Floribunda, and Rugosa. Be aware that some of these are quite hardy while others can be sensitive, so be sure to choose varieties that are suited to your garden’s climate and your lifestyle.
Planting for Success
Sunlight is Mandatory
Plant roses where they will collect a minimum of 5 to 6 hours of full sun per day. Roses grown in weak sun may not die at once, but they weaken progressively and will fail to bloom profusely.
Planting Procedure
Give your roses plenty of organic matter when planting, such as well-aged compost or manure, and ensure you don’t crowd them. When relocating or initially planting roses, dig a much bigger hole than you think you need—for most types, the planting hole should be about 15 to 18 inches wide.
- Bare-Root Roses – Keep your bare-root rose soaking in water until you are ready to place it in the ground.
- Safety First – Wear sturdy gloves to shield your hands from prickly thorns and keep all your planting utensils nearby.
Relocation Timing
Roses can be cut back and moved in either spring or winter, but definitely not in summer, as they may suffer and die in the high temperature. Large rose canes can be cut back by as much as two-thirds, and smaller ones to within 6 to 12 inches of the ground before the move.
Watering and Feeding for Maximum Bloom
Watering Techniques
Roses require at least an inch of water weekly throughout their growing season, starting in spring. Roses are very prone to fungal diseases, such as black spot and powdery mildew, especially when their foliage is kept too wet.
Deep Watering
Attentively water your roses, ensuring you soak the entire root zone at least twice a week in dry weather. Avoid frequent shallow sprinklings, which won’t reach the deeper roots and may encourage fungus.
Drainage is Key
Roses do best with ample water, but if adequate drainage is not provided, the roots can easily drown. The ideal soil is rich, loose, and drains quickly. Not providing adequate drainage is one of the worst mistakes you can make.
Mulch Conservation
Use mulch to help save water, decrease stress, and encourage healthy growth. Apply a 2 to 4 inch layer of chopped and shredded leaves, grass clippings, or shredded bark around the base of your roses. Allow about an inch of space between the mulch and the base stem of the plant.
Feeding Your Roses
Feed roses on a regular basis before and throughout the blooming cycle.
- Fertiliser Type – A slow-releasing fertilizer is best, or you can apply a balanced granular fertilizer (such as 5-10-5 or 5-10-10) a minimum of once a month during the hotter months.
- Application – Allow ¾ to 1 cup of granular fertiliser for each bush, and sprinkle it around the drip line (the area beneath the outermost leaves), not directly against the stem.
- The Epsom Salt Boost – Apply an additional tablespoon of Epsom salts (magnesium sulphate) along with your fertilizer; the magnesium will encourage new growth from the bottom of the bush, producing more vigorous canes.
- Warning – Avoid chemical fertilizers and pesticides if you plan on harvesting the rose hips or petals for food or tea.
Pruning and Winterizing
Pruning and Deadheading
Pruning roses should be done every spring to remove old or diseased plant material and shape the bush.
-
Tools
Start with pruning shears for smaller growth. Use loppers (the bigger, long-handle shears) for growth that is more than half an inch thick. A small pruning saw is handy, as it cuts on both the push and the pull.
-
Deadhead Religiously
Remove old flower blossoms (deadheading) to encourage the plant to make more flowers instead of using energy to make seeds. Every leaf has a growth bud, so removing the spent bloom directs energy into new growth and repeat flowering.
-
Cleanliness
Always clean away any trimmed debris from around the base of the rose bushes, as this material can harbor disease and insects.
-
Timing for Winter
Stop deadheading all your rose plants 3 to 4 weeks before winter begins so as not to encourage new growth at a time when new, tender shoots may be damaged by the cold.
Preparing Your Roses for Winter
Winter preparation is about insulation and reducing stress.
- Pruning – Do not perform major pruning in the winter; simply cut off any dead or diseased canes.
- Feeding and Watering – Stop fertilizing 6 weeks prior to winter but continue watering during dry weather to help keep plants fortified.
- Insulation – Mulch or add compost before the weather turns too cold. A fresh layer of compost, dry wood chips, or chopped leaves are all excellent for insulating your rose beds and protecting the roots from frost.
Managing Pests and Diseases
Good gardening practices, such as removing dead leaves and pruned canes, will significantly help reduce pests and diseases. Always check with your local nursery to find out which pests are most prevalent in your area.
Common Problems
Roses are susceptible to various pests and diseases. Here are some of the most frequent issues you might encounter:
Pests
- Aphids – These sap-sucking insects are often clustered on new growth and flower buds.
- Stem Borers – These pests tunnel into rose canes, often causing wilting.
- Japanese Beetles – These can quickly skeletonize rose leaves, leaving only the veins behind.
- Spider Mites – These tiny mites cause stippling or bronzing on the leaves, especially in hot, dry conditions.
Diseases
- Black Spot – This common fungal disease causes dark spots on leaves, often leading to premature defoliation.
- Powdery Mildew – This appears as a white, dusty coating on the leaves and stems.
Natural Pest Deterrent

Roses are a delectable treat for pests, but you can try planting lavender near your roses. Not only will you have the makings of a nice potpourri, but the strong scent of lavender discourages most common rose pests.
Fun Fact
Rugosa roses are extremely useful! Their rose hips are overloaded with Vitamin C and can be used for jams, jellies, syrups, pies, teas, and wine. The petals can also be tossed into salads for colour or distilled to make rose water.
Jim’s Mowing NZ – Expert Rose Maintenance
Pruning roses, especially established climbers, can be complex and intimidating. Using the wrong technique can hinder next season’s blooms, and handling prickly thorns requires careful preparation.
For expert assistance with pruning your precious roses, preparing your beds, or any other challenging gardening maintenance, the team at Jim’s Mowing is ready to help!
Conclusion
Roses truly are the queens of the garden, but they demand consistency in watering, feeding, and pruning. By following these foundational tips—especially maintaining clean beds and avoiding wet foliage—you’ll be rewarded with a spectacular, fragrant display year after year.
If you need professional assistance to get your roses into peak health, don’t hesitate to contact us! Call Jim’s Mowing on 0800 454 654 or book online today for a free, no-obligation quote!
Make Your Garden a Wildlife Sanctuary
/in Articles, Gardening/by infotechMake Your Garden a Wildlife Sanctuary
Gardeners are in the front line of the battle to preserve nature. By taking simple measures, you can help provide essential food and habitats, turning your backyard into a healthy ecosystem. Australian gardeners, in particular, have a brilliant opportunity to experience the pleasures of our exceptional flora and fauna. With some attentive landscaping and suitable plant selection, we can attract many captivating native creatures, helping to sustain breeding populations for future generations.
In this Jim’s Mowing blog, you’ll learn:
- Simple methods for designing a wildlife habitat.
- How to safely attract birds, butterflies, and frogs.
- The danger of chemicals and the need for natural pest control.
- Which native and exotic plants provide crucial winter food sources.
Part 1: Guidelines for Drawing Wildlife to Your Garden
The types of wildlife that will flourish in your garden depend on several factors, including the proximity of adjoining bushland and the presence of predators. The most effective way to attract animals is to design your garden as a true habitat where wildlife can not only visit but also make a home.
1. Provide Essential Shelter and Perches
Creating safe havens is paramount. Wildlife needs places to rest, observe, and hide from predators.
- Nesting Boxes
These make a good substitute for tree hollows, which are rare in urban areas. Place them high for birds and marsupials.
- Tall Perches
Trees or other tall structures provide vantage points where birds can survey your garden and decide if they can find food and shelter in safety.
- Ground Cover
Rockeries, logs, and piles of sticks offer vital habitats for reptiles such as blue-tongue lizards and frogs.
2. Protect Against Predators and Hazards
While inviting wildlife in, you must also mitigate risks.
- Counteract Predators
Take active steps to counteract the presence of predators such as cats, dogs, and foxes, especially at dawn and dusk.
- Netting Caution
If you have fruit trees and popular roses, you may need to use netting during times when damage is most likely. Always erect a framework covered with netting, or inspect the thrown-over netting frequently. Birds, bats, and snakes can get caught in netting, requiring you to carefully cut them loose.
- Window Collisions
If a bird sees what it perceives to be a clear flight path through your house, injury or death can result when it impacts an intervening window. Blinds, curtains, and decorative objects placed behind the window will help discourage this accidental problem by breaking up the reflection.
3. Commit to Chemical-Free Gardening
This is arguably the most crucial guideline. Do not use chemicals in your garden.
- Toxicity
Chemicals pose an immediate risk of acute toxicity, which can result in immediate death for wildlife.
- Long-Term Harm
Even small doses lead to a long-term build-up of toxic substances in local wildlife populations, affecting their breeding and health.
- Natural Pest Control
In many cases, native birds, reptiles, and frogs will provide adequate natural control of pests such as snails and aphids without the need for chemical intervention.
4. Understand Supplementary Feeding
Supplementary feeding can be provided at times of the year when natural supplies are scarce, but it should never become a primary food source. The healthiest course is to try to provide natural food sources for as great a part of the year as possible.
Safe Placement
Nectar feeders, seed trays, and tables should be placed in locations that provide a safe haven from unintended predators that may be lurking nearby. Clean all feeders regularly to prevent the spread of disease.
Part 2: Attracting Specific Wildlife Groups
Tailoring your plant choices and garden features can help you attract specific and delightful creatures.
Attracting Native Birds to Your Garden
Birds are one of the simplest groups to entice due to the wealth of appropriate native Australian plants available.
- Nectar Feeders
Nectar-feeding birds are easily attracted by a range of plants, including eucalypts, angophoras, banksias, grevilleas, waratahs, and kangaroo paws. Look for tubular-shaped flowers, which indicate plants pollinated by honeyeaters, spinebills, and wattlebirds.
- Seed Eaters
The remarkable parrot family, including lorikeets and rosellas, feeds on nectar as well as seeds from eucalypts, acacias, casuarinas, and tea trees. Finches, such as red-browed firetails and zebra finches, will feed on the seed of native grasses like wallaby and kangaroo grass.
- Insect Eaters
Superb fairy-wrens, fantails, and thornbills are insectivorous and will greatly aid in controlling pest insects in your garden.
- Protection for Small Birds
Small birds will appreciate dense, spiky-leafed plants such as Grevillea rosmarinifolia, Acacia oxycedrus, and Melaleuca styphelioides to enable them to have a safe haven and nesting site.
- Fruiting Plants
Rainforest plants, including Lillypillies and blueberry ash, have colourful berries that appeal to parrots as well as various species of native pigeons.
Enticing Butterflies to your Garden
Butterflies and moths bring a special beauty to the garden and play a vital role as pollinators. Most species feed on nectar from the base of flowers.
Landing Platforms
Plants like Everlasting and Brachyscome daisies not only provide nectar but the flat daisy flower heads provide a great landing platform for butterflies.
Host Plants
Do not automatically destroy all caterpillars in your garden unless they are doing major damage. Caterpillars are the larval stage of butterflies and moths, and they require their specific host plants to complete their life cycle.
Attractive Plants
Other plants particularly attractive to butterflies include Grevilleas, Pimeleas (rice flowers), Lomandras (mat-rushes), and Dianellas (flax lilies).
Attracting Reptiles and Frogs
Frogs and small reptiles will be attracted by ponds that have a natural feel, complete with suitably placed rocks and water plants.
Pond Benefits
Such a pond will also benefit birds and mammals, and as a side benefit, frogs and reptiles will control mosquito larvae and other insect pests.
Simple Pond Design
A pond can be as simple as a solid styrofoam box or an old kid’s paddling pool—a great project to share with the children. Larger pools can be created with commercially available plastic ponds or rubber liners.
Water Safety
Be aware that care is needed with young children, as they can drown in even shallow bodies of water. A netting overlay can be made to cover the pond for peace of mind.
Perches and Safety
A log or large rock placed partially in the water provides a safe perch for birds to drink and bathe, shielded from predators like cats.
Winter Food Sources for Garden Wildlife
Providing food in the colder months is critical, as natural supplies are often scarce.
- Native Winter Blooms
A number of Australian plants offer winter sustenance, such as most correas (native fuchsias), various Banksia species, and ever-blooming grevilleas (e.g., ‘Robyn Gordon,’ ‘Superb,’ ‘Moonlight,’ and ‘Misty Pink’).
- Seed in Autumn
Autumn-flowering wattles (Acacia iteaphyla, linifolia, and terminalis) along with native grasses such as kangaroo and wallaby grass will provide seed through the winter months.
- Exotic Support
Many exotic garden plants, such as camellias, red hot pokers, fuchsias, and members of the hibiscus family and abutilon, will also provide supplementary food sources for a number of native bird species.
- Weed Management
A number of hostile or weedy species like jasmine, ivy, and even blackberries can and do provide nesting and sheltering sites for birds and possums. If you intend to substitute these weedy species, it is best to gradually remove them and replace them with more environmentally friendly, dense native plants rather than leave large, exposed gaps in the landscape.
Jim’s Mowing NZ: Professional Gardening Services
Creating a balanced wildlife sanctuary often requires more than just planting—it involves structural landscaping, careful weed removal, and potentially converting existing areas (like an old pool) into a habitat.
If you want to add a professional touch to your wildlife sanctuary, or if you need assistance with the physical work, call the experts at Jim’s Mowing NZ! Our Landscaping Services are perfect for:
- Habitat Design – Strategically planting native species and placing habitat elements like rockeries and logs.
- Weed Removal – Safely and gradually removing invasive weeds and replacing them with native screening plants.
- Garden Conversions – Assistance with converting older garden areas or pools into low-maintenance wildlife-friendly water features.
- Lawn Care – Don’t forget our complete Lawn Care Services to keep your entire property thriving while preserving habitat borders.
Conclusion
Turning your garden into a wildlife sanctuary is a profound and rewarding investment in local biodiversity. By thinking about your backyard as part of a larger ecological corridor and providing the simple needs of food, water, and shelter, you can enjoy the fascinating spectacle of nature right outside your window. From the smallest finch to the largest lizard, every creature that visits your garden helps build a healthier, more balanced ecosystem for your community.
For professional assistance with habitat planning, landscaping, or garden maintenance, call Jim’s Mowing on 0800 454 654 for your free no-obligation quote or book online now!


