Choosing The Best Equipment For Hedging

Giving your hedge the right size and shape you want it to have requires the use of the appropriate hedging tools and equipment. With the wide variety of gardening tools and equipment designed for the purpose of trimming and shaping a hedge, you will have difficulties selecting the best one to purchase.

Hedge Trimmer

A hedge trimmer is the perfect piece of gardening equipment you need to have well-maintained hedges.  This gardening tool can save you time and prevent aching arms when you’re working on your hedges. In addition, using this piece of equipment will help you get a clean, neat and sharp finish to your hedge.

To make sure you invest in the right hedge trimmer, take note of the following tips:

  • Consider the trimmer’s weight. Keep in mind that you will be using the trimmer for long periods of time, especially if you have hedges surrounding your house or yard. As such, make sure you select a hedge trimmer that’s not too heavy to hold and is well-balanced.
  • Determine its primary use. Will you be doing a lot of heavy cutting or will you use the equipment to simply trim leaves? If you will be regularly cutting heavy, bulky branches, you will require a more powerful model. Models with wide teeth spacing are more suitable for heavy-duty hedging. Hedge trimmers with narrow teeth, on the other hand, are more suitable for trimming leaves and regular hedges.
  • Consider the blade length you require. The right length of the blade to choose depends greatly on how much hedge you have to trim. Trimmers with large blades allow more hedging to be cut faster but they are heavier and more unwieldy than those with shorter ones. For extensive hedging, it is best to get a tool with a 75cm blade. For normal hedging, a trimmer with 35-60cm blade is usually sufficient.
  • Factor in the trimmer’s vertical edging features. Vertical edging is easier if you use a trimmer with a rotating head. Also, if the trimmer has a wraparound front handle with multiple switches, you will have an easier time switching from cutting horizontally to vertically.
  • Look for good safety features. In terms of safety features, a hand guard will help protect the user from debris coming from the trimming process. Also, a good safety feature to look for is a safety switch on both handles so that the trimmer won’t start or run unless both handles are gripped. This effectively keeps your hands out of harm’s way.
  • Source of power. Cordless, battery-powered trimmers are easier and less stressful to use since you won’t need to worry about straying too far from the power source or constantly snagging cords on ladders or foliage. A trimmer that runs on batteries also operates on full power until they become empty. As such, you won’t have to worry about its efficiency running at less than 100% once it slowly powers down to empty.

Choosing the right trimmer can help you have an easier time improving and maintaining your hedges. Take the time to study the available products so that you can make the right decision when it’s time to buy.

For more garden and landscaping tips, tune in for more Jim’s Mowing NZ blogs.


What Are the Best Lilly Pilly Varieties?

Royal Flame

Syzgium Luehmanni or Royal Flame

Lilly pillies are some of the most popular plants in Australia. People enjoy their lovely changing colour and how they grow voluminously well, making them perfect for hedging and topiaries. Lilly pillies yield fluffy white or greenish flowers in the spring and red, purple or whitish berries. You definitely will get a visually pleasing, colourful garden or lawn if you opt to plant the lilly pilly as hedging.

There are so many varieties of lilly pillies in Australia that there’s even a lot of confusion over their names. But if you’re looking through the best lilly pilly varieties to determine which is the best to plant in your property, the list below provides the best choices as they are the least prone or most resistant to the lilly pilly psyllid (native insect related to cicadas) that causes ugly pimples on the leaves of the plant.

  • For the big variety (those that grow five metres and over), the top 2 picks are the Acmena smithii var. and minor Syzgium luehmannii. These two are easy to maintain, as they are completely resistant to psyllids.
  • For the mid-sized variety (those that grow three to five metres in height), the best lilly pilly variety is the Acmena smithii or Hot Flush. It’s the only one among the popular mid-sized varieties that’s resistant to psyllids.
  • For the little variety (those that grow two metres and below), the Syzgium luehmanni or Royal Flame is the best performer and is also completely resistant to psyllids.

    Syzgium luehmannii

    Syzgium Luehmanni in Bloom

  • For the tiny or 1 metre lilly pillies, Acmena smithii or Hedgemaster is the perfect choice.
Acmena smithii

Acmena Smithii

But if you’re not too concerned about the effect of psyllids on your lilly pilly, the Syzgium austral or Bush Christmas, S. austral or Elite, and S. austral or Aussie Southern are great beauties definitely worth considering. All of these grow really well but you really will just need proper care for these varieties. Your best bet would be to turn to professional service providers for tips on how to prevent the attack of psyllids and other problems that lilly pillies encounter, such as scale (soot-like stains) which is often caused by ants and pollution.

It’s worth mentioning as well that lilly pillies are more suitable for warmer climates. Therefore, if you live somewhere that’s chilly and often gets frost, seek the advice of lawn care professionals on the best way to plant lilly pillies and ways to care for them given the challenging climate conditions.

Call Jim’s Mowing on %%PHONE_NUMBER%% for all of your gardening needs or simply book online for a free no-obligation quote!

A Guide to Pruning

A Guide To Pruning New Zealand Native Plants

Pruned roses

Native New Zealand plants are delightful to have in your garden nevertheless they are not maintenance free. While the majority of New Zealand plants need less care than many exotic plants, they do profit greatly from some fertilizing, pruning and watering. Pruning promotes a healthy growth, extends the life of short lived plants and enhances a grander display of flowers.

In this Jim’s Mowing blog, you’ll learn:

  • The Types of Pruning
  • When to Prune
  • How to Maintain Pruning Tools

Types of Pruning

Tip Pruning

To promote lateral growth and therefore bushier plants, regular tip pruning of the soft new growth is favoured over infrequent hard pruning and should be initiated when plants are very young, desirably at seedling or rooted cutting stage. Tip pruning is best commenced after flowering and during the growing season for faster outcomes. Pruning too late in the season bares the risk of decreasing the next season’s flowers.  Constantly carry secateurs when you’re out and about in the garden as this allows you to effortlessly practice tip pruning.

Universal Pruning

When pruning to regulate unwanted growth, it is better to only make clean cuts that slope away from buds. Cut close and parallel to existing branches and leaf nodes, but not level with them.

With large branches, first cut the bark below, then make the top cut, this prevents tearing of the bark as the branch falls away.

Use the plant’s natural habit as a guide. If it is slow-growing, compact and well-shaped, then only light pruning is required to tidy it

up. If it is fast growing, then further pinching-out or pruning should be carried out. Prune the whole shrub all at once, that way even growth will ensue all over the plant.

It is best not to prune in winter as the resulting new growth can easily be damaged by cold temperatures. When cutting into plants that flower on old wood such as many Leptospermums, Melaleucas and Hakeas, be conscious that you may lose next year’s flowers.

Pruning Screen and Hedge Plants

pruning

Successful screen and hedge plants need to be given consistent but relatively delicate pruning all over to encourage and preserve dense growth. If you are using this type of pruning for Lilly pillies such as:  Syzygium smithii and various forms, it will keep them bushy to the ground.

Pruning to Mend Damage

When branches are broken or attacked by insects and/or borers, the branch should be pruned back to clean unspoiled wood and close to a limb or leaf node. If left in a damaged state, branches are prone to infection and dying back.

Pruning to Improve Blossoming

Elimination of old flowers should be commenced after the flower is finished. This way the plant does not put its vitality into producing seed. It also has the same effect as tip pruning as it enhances new lateral growth and hence more flowers next season. Callistemons, and fine-leaved Melaleucas definitely benefit from having the top two thirds of their flowers detached and is an essential pruning action.

Pruning to Decrease New Growth

Pruning flush with the trunk should result in no new leaf growth.  This is ideal if you are pruning lower branches off a shrub to make it more tree like.

Pruning When Direr Outcomes Are Needed

Trying to keep bulky plants to a convenient size by pruning is hard work and is best done frequently through-out the year. Be aware that hard pruning into old wood may possibly kill some plants. If you have any old woody shrubs that are more of a monstrosity than an asset in the garden, arm yourself with secateurs and a pruning saw and practice on it.

The simplest way to invigorate Callistemons, fine leaved Melaleucas and Leptospermums is to lop them off at ground level. If carried out in spring they will rapidly put out new shoots and grow into bushy shrubs with striking healthy foliage. Water well to maximise new growth. Radical pruning of older more senile Grevillea

s is not always successful. If the plant has gotten to the point where you have nothing to lose, prune hard and see what happens.

When pruning large weighty branches, make the initial cut about 150 mm further out than where you need to make the final cut. When the heavy branch has been removed, make an additional cut to clean up, this minimises tearing of the bark. Note that untidy cuts or torn bark can create entry points of fungal diseases and other such hazardous elements.

Maintaining Your Pruning Tools

Be sure to use sharp tools and disinfect them by scrubbing with methylated spirits. Blunted tools leave ragged edges on the branch and are an invitation for disease to attack your plants.

Don’t have the required tools or enough time? You can always take the hassle out of pruning and give Jim’s Mowing a call on 0800 454 654 or book online for a free, no obligation quote!

Tips for Beautiful Roses

The reward for gaining and applying the relevant knowledge about rose gardening is big, beautiful rose bushes, laden with colourful and fragrant blooms. Many beginner gardeners are intimidated by roses, but with the right foundational knowledge about pruning, watering, and feeding, you can ensure your plants thrive.

In this Jim’s Mowing blog, you’ll learn:

  • The different types of roses and how to choose the right one for your garden.
  • Essential planting and watering requirements to prevent common fungal diseases.
  • The best way to prune and prepare your roses for winter dormancy.
  • Simple methods for managing common rose pests and diseases.

Choosing and Planting Your Roses

Climber Rose varieties

Types of Roses

The types of rose bushes you can choose from are extensive, including Shrub Roses, Miniature Roses , Climber, Grandiflora, Floribunda, and Rugosa. Be aware that some of these are quite hardy while others can be sensitive, so be sure to choose varieties that are suited to your garden’s climate and your lifestyle.

Planting for Success

Sunlight is Mandatory

Plant roses where they will collect a minimum of 5 to 6 hours of full sun per day. Roses grown in weak sun may not die at once, but they weaken progressively and will fail to bloom profusely.

Planting Procedure

Give your roses plenty of organic matter when planting, such as well-aged compost or manure, and ensure you don’t crowd them. When relocating or initially planting roses, dig a much bigger hole than you think you need—for most types, the planting hole should be about 15 to 18 inches wide.

  • Bare-Root Roses – Keep your bare-root rose soaking in water until you are ready to place it in the ground.
  • Safety First – Wear sturdy gloves to shield your hands from prickly thorns and keep all your planting utensils nearby.

Relocation Timing

Roses can be cut back and moved in either spring or winter, but definitely not in summer, as they may suffer and die in the high temperature. Large rose canes can be cut back by as much as two-thirds, and smaller ones to within 6 to 12 inches of the ground before the move.

Watering and Feeding for Maximum BloomFlorabunda Roses

Watering Techniques

Roses require at least an inch of water weekly throughout their growing season, starting in spring. Roses are very prone to fungal diseases, such as black spot and powdery mildew, especially when their foliage is kept too wet.

Deep Watering

Attentively water your roses, ensuring you soak the entire root zone at least twice a week in dry weather. Avoid frequent shallow sprinklings, which won’t reach the deeper roots and may encourage fungus.

Drainage is Key

Roses do best with ample water, but if adequate drainage is not provided, the roots can easily drown. The ideal soil is rich, loose, and drains quickly. Not providing adequate drainage is one of the worst mistakes you can make.

Mulch Conservation

Use mulch to help save water, decrease stress, and encourage healthy growth. Apply a 2 to 4 inch layer of chopped and shredded leaves, grass clippings, or shredded bark around the base of your roses. Allow about an inch of space between the mulch and the base stem of the plant.

Feeding Your Roses

Feed roses on a regular basis before and throughout the blooming cycle.

  • Fertiliser Type – A slow-releasing fertilizer is best, or you can apply a balanced granular fertilizer (such as 5-10-5 or 5-10-10) a minimum of once a month during the hotter months.
  • Application – Allow ¾ to 1 cup of granular fertiliser for each bush, and sprinkle it around the drip line (the area beneath the outermost leaves), not directly against the stem.
  • The Epsom Salt Boost – Apply an additional tablespoon of Epsom salts (magnesium sulphate) along with your fertilizer; the magnesium will encourage new growth from the bottom of the bush, producing more vigorous canes.
  • Warning – Avoid chemical fertilizers and pesticides if you plan on harvesting the rose hips or petals for food or tea.

Pruning and Winterizing

Grandiflora RosesPruning and Deadheading

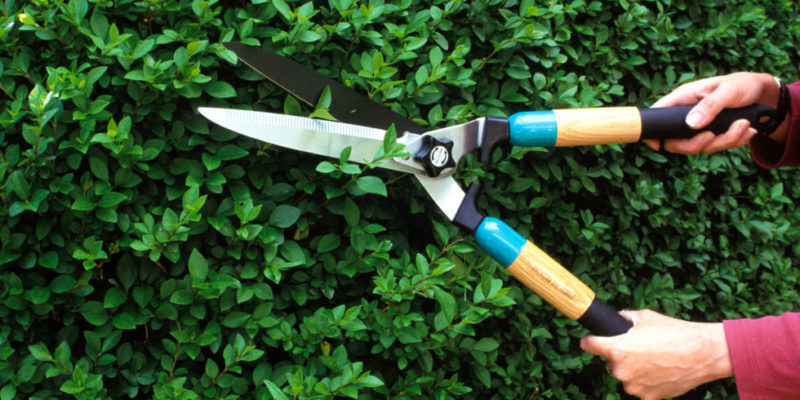
Pruning roses should be done every spring to remove old or diseased plant material and shape the bush.

  • Tools

Start with pruning shears for smaller growth. Use loppers (the bigger, long-handle shears) for growth that is more than half an inch thick. A small pruning saw is handy, as it cuts on both the push and the pull.

  • Deadhead Religiously

Remove old flower blossoms (deadheading) to encourage the plant to make more flowers instead of using energy to make seeds. Every leaf has a growth bud, so removing the spent bloom directs energy into new growth and repeat flowering.

  • Cleanliness

Always clean away any trimmed debris from around the base of the rose bushes, as this material can harbor disease and insects.

  • Timing for Winter

Stop deadheading all your rose plants 3 to 4 weeks before winter begins so as not to encourage new growth at a time when new, tender shoots may be damaged by the cold.Minature Rose varieties

Preparing Your Roses for Winter

Winter preparation is about insulation and reducing stress.

  • Pruning – Do not perform major pruning in the winter; simply cut off any dead or diseased canes.
  • Feeding and Watering – Stop fertilizing 6 weeks prior to winter but continue watering during dry weather to help keep plants fortified.
  • Insulation – Mulch or add compost before the weather turns too cold. A fresh layer of compost, dry wood chips, or chopped leaves are all excellent for insulating your rose beds and protecting the roots from frost.

Managing Pests and Diseases

Good gardening practices, such as removing dead leaves and pruned canes, will significantly help reduce pests and diseases. Always check with your local nursery to find out which pests are most prevalent in your area.

Common ProblemsShrub Roses

Roses are susceptible to various pests and diseases. Here are some of the most frequent issues you might encounter:

Pests

  • Aphids – These sap-sucking insects are often clustered on new growth and flower buds.
  • Stem Borers – These pests tunnel into rose canes, often causing wilting.
  • Japanese Beetles – These can quickly skeletonize rose leaves, leaving only the veins behind.
  • Spider Mites These tiny mites cause stippling or bronzing on the leaves, especially in hot, dry conditions.

Diseases

  • Black Spot – This common fungal disease causes dark spots on leaves, often leading to premature defoliation.
  • Powdery Mildew – This appears as a white, dusty coating on the leaves and stems.

Natural Pest Deterrent

Rugosa Roses

Roses are a delectable treat for pests, but you can try planting lavender near your roses. Not only will you have the makings of a nice potpourri, but the strong scent of lavender discourages most common rose pests.

Fun Fact

Rugosa roses are extremely useful! Their rose hips are overloaded with Vitamin C and can be used for jams, jellies, syrups, pies, teas, and wine. The petals can also be tossed into salads for colour or distilled to make rose water.

Jim’s Mowing NZ – Expert Rose Maintenance

Pruning roses, especially established climbers, can be complex and intimidating. Using the wrong technique can hinder next season’s blooms, and handling prickly thorns requires careful preparation.

For expert assistance with pruning your precious roses, preparing your beds, or any other challenging gardening maintenance, the team at Jim’s Mowing is ready to help!

Conclusion

Roses truly are the queens of the garden, but they demand consistency in watering, feeding, and pruning. By following these foundational tips—especially maintaining clean beds and avoiding wet foliage—you’ll be rewarded with a spectacular, fragrant display year after year.

If you need professional assistance to get your roses into peak health, don’t hesitate to contact us! Call Jim’s Mowing on 0800 454 654 or book online today for a free, no-obligation quote!

Tips on Pruning Plants

Important Tips on Pruning Plants

To keep your plants in shape, regular pruning is required whether your plants are grown inside or outside. Be careful though, over-pruning can be hazardous so it’s extremely important to know which plants to prune, when to prune and how. It is best to prune fruiting and flowering plants whilst they are not in bloom, however other plants such as shrubs and trees which blossom in the spring time, require the old buds to be pruned in order to blossom new ones. Some plants need pruning all year round, so it can be a little perplexing at first, just keep in mind that the worst case scenario is that your plant or plants may generate a reduced amount of fruits and flowers.

pruning-tools-1


Pruning Tools

Pruning can feel like a daunting task if you are a beginner gardener. To make the process easier, make sure that you possess the correct equipment. Here is a list of basic tools that will aid any gardener make their garden look its best.

  • Loppers – long handles with short sturdy blades – used for pruning thick branches that are hard to reach
  • Saw – needed for thick branches (15 cm +)
  • Shears – appear to be heavy duty scissors – useful for trimming branches and leaves that are not so thick
  • Hand Pruners – short thick blades – helpful for cutting thinner branches and stems (up to 3cm)

It is more practical to have all these basic tools on hand prior to commencing pruning and the better the quality the better the job they will do and the longer they will last. It is imperative to ensure all tools are cleaned properly after each use as some soil can be full of plant diseases and you really don’t want to transfer them onto other plants.

Flowering Trees, Shrubs and Vines

These three very different plant categories need pruning at all different times throughout the year.

 Flowering Trees and Shrubs

Flowering trees and shrubs normally blossom should be pruned mid-autumn as they bloom in spring. They can be pruned earlier if they have grown predominantly large but beware, you do not want to lose too many blooms in the process.

clematis

Clematis

Clematis

Clematis blooms on its own timetable, but generally it is best to prune them back after they have completed blossoming. This will ensure that they have room to continue growing for the next bloom. To guarantee a long life, vines need appropriate pruning, so it’s vital to pay close attention to the state of the Clematis.

Need help?

If you have need help pruning your garden, contact Jim’s Mowing on 0800 454 654 or Book a Pruning Job Online.