How Jim’s Mowing is operating under COVID alert levels

With most of New Zealand entering spring 2021 in COVID Alert Level 2, with the exception of Auckland which is in Level 3, the team at Jim’s Mowing NZ want to reassure you that we are doing our best to keep our customers, you and your families, safe.

We understand that we all, as part of the team of 5 million people, must do everything we can to protect one another and eliminate COVID-19 from our communities. And where possible, our franchisees have had at least one vaccination shot.

So, if your lawn needs a mow or you want some work done on your garden, here’s what you can expect from our franchisees at Jim’s Mowing NZ.

Alert Level 4 – Lockdown

While in lockdown in Level 4, our franchisees will not be working. As recommended by the New Zealand government, our franchisees will be staying at home and only going out for food supplies or to get medical attention.

On those occasions where our franchisees do have to leave their household bubble, we will be wearing masks and keeping the 2-metre social distancing rule.

If you do contact us during Lockdown, our team will work our hardest to put you on a schedule to work with once the alert level is lowered.

Alert Level 3 – Restrict

While in Level 3 our Jim’s Mowing NZ franchisees can work and service requests from customers, which means that most of New Zealand can book our services as of September 2021. That said, it’s important to us that we protect our customers, particularly those who might be from more vulnerable communities.

You can expect our services under a Level 3 alert to look a little different. We will be keeping to the 2-metre social distancing rule, so will distance where we do have to communicate with you. Our franchisees will also be wearing masks and using contactless payment options where possible, to minimise the risk of spreading COVID-19.

Alert Level 2 – Reduce

Similar to Level 3, our Jim’s Mowing NZ franchisees will continue to work during Level 2, ensuring we wear masks, observe social distancing, and use contactless payment where possible. We will also be adhering to government advice both at work and at home.

Alert Level 1 – Prepare

With COVID still prevalent overseas, particularly with our neighbours in Australia, it’s up to all of us to continue to be prepared if another outbreak of COVID occurs. As such, like Level 2, our Jim’s Mowing NZ franchisees will continue to social distance, wear masks, and use contactless payment options where reasonable and possible during Level 1.

We care about the safety of our customers and their families, as well as the safety of our franchisees and their families, so you can rest assured that we’re doing our best to protect our communities in our professional and personal lives. Whether you’re in lockdown or not, feel free to give us a call on 0800 545 654 or contact us online and we’ll get out to you as soon as we safely can.

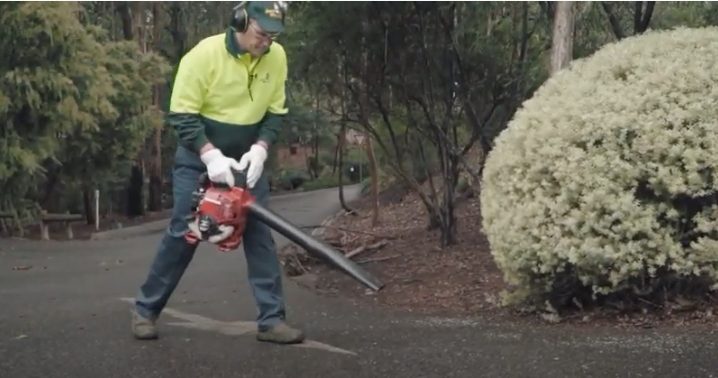
How to Use a Leaf Blower like a PRO

Autumn has come and gone, which means many trees have now shed their leaves. While the leaves on the ground can be a different look (and sometimes fun to jump on, if you see a particularly crunchy-looking one!), many may wish to scoop them into a garden bed or dispose of the dead leaves. Dried leaves can be placed into a green bin, or added to your compost bin.

One way to clear leaves is to use a leaf blower. But leaf blowers aren’t just made for blowing leaves (despite what the name might suggest), these machines can also be used to dry wet surfaces and moving grass clippings. They’re pretty versatile pieces of equipment, which is why it can be handy to know how to use them!

There is more to leaf blowing than buying a machine, bringing it home, and turning it on. It’s important to consider safety precautions that need to happen, the time of day to use the leaf blower, and how to do so efficiently – just to name a few!

The internet has many video resources showing how to use a leaf blower – in fact, we have one ourselves – which could be helpful if you wish to learn the basics, check out our video below. If you would like additional help to keep your garden looking tidy, the team at Jim’s Mowing NZ provide complete Lawn Mowing and Garden Maintenance services throughout New Zealand.

In this article, we take a look at some additional tips and tricks regarding how to use a leaf blower, including how to efficiently move debris!

Using a leaf blower

Which blower to choose?

Before you begin on the job, you’ll need to pick out a blower. There are many different varieties of leaf blower on the market from smaller models through to large, powerful machines. There are Stihl leaf blowers, Ryobi leaf blowers, Husqvarna leaf blowers, plus blowers from many other brands. When it comes to choosing the best leaf blower for your needs, things to consider include how large the jobs you wish to tackle are, and how often you’re looking to use the machine. Be sure to do research into different brands and models, to find the type that is best for you!

Choose an appropriate time

While not everyone has the same work or sleeping schedule, choosing a time of day when most people are awake (and not trying to put their kids to sleep!) is a must when using a leaf blower at your residential property. Being woken up by a leaf blower isn’t the most peaceful way to start the day, so try to start work at a suitable time. If you want to take an extra step of consideration, think about knocking on your neighbours’ doors and asking them what times suit best for loud garden and housework.

Use safety gear

It is important to ensure you are equipped with proper protection when using a leaf blower. Before beginning the job, be sure to put on protective eyewear, filled-in shoes, gloves, ear protective equipment, and covered clothing. Make sure no loose clothing ties or strands of hair are flying about, and keep an eye out for where others are around you when doing the job. Ensuring you use these machines safely is imperative, so be sure you are stocked up on safety gear and protection before you begin!

Don’t rush in and start blowing the debris

While it can be exciting to get started, it’s best to not rush into it before thinking about the how. If you approach the item you wish to clear with too much force, you could find it blowing back and then having a bigger mess to have to clean up! What you want to do is start a bit further back, making sure to work around the debris you wish to move, and blow it into the spot you wish to move it to.

Decide where you want the debris to be moved to 

This may seem like an obvious tip, but it’s good to think about where you want your product to be moved to before you begin the process of clearing it. Are you looking to blow your leaves into a garden bed, or are you trying to make a pile so that it can be cleared more efficiently? Decide this before the job has started to avoid confusion (and the blowing of leaves back and forth in indecision!). Leaves can be a great addition to a compost bin, so don’t feel like they all need to end up in the garbage!

Don’t try to clear wet garden debris

Trying to clear wet debris just doesn’t work very well, so don’t think you’ll be popping outside to clear leaves away right after a rainstorm has passed! Wet and damp garden debris doesn’t much like to be blown around, making the task a lot harder (and more frustrating) for you. Wait until the debris has dried before attempting to clear it and it should easily be shifted.

We hope this article has been useful in showing some tips and tricks regarding how to use a leaf blower. Leaf blowers can make a great addition to your garden machinery, but it’s important to be informed (and well-protected) before you begin! If you would like to find out more about these machines and their uses, there are many great resources available on the web (and in books) explaining the process in more details. Good luck with your clearing!

What are 6 Easy to Grow Food-Producing Plants

Many people love the idea of having a veggie patch in their yard, but the idea of getting started can seem daunting. While some fruits, vegetables and seeds can be tricky to grow for the inexperienced gardener, there are many out there that are relatively simple. We’ve outlined some to get you started on your food-growing journey.

How to Look After Your Garden While You’re Away

Whether it’s a few days up the coast or a few weeks overseas, it can be important to consider what will happen to your garden while you’re away on holiday. If you have lots of plants, flowers and veggies growing, one of the most important points to consider is how to ensure they are given enough water in your absence.

Below we have a couple of tips you can adopt to help ensure your garden is taken care of while you’re off relaxing on holiday!

Mulch

Mulch can be a great way of keeping water around your plants, and mulching before you leave on a short trip is one method of keeping plants healthy while you’re away. Mulch can also help to protect plants against invasive weeds, and boost the health of the soil over time. There are many different types of mulch that you can choose from. Some people choose to use leaves or wood from cut-back trees, while others may prefer grass clippings. Different varieties of mulch can also be purchased from your local nursery.

Mow the lawn

Before you leave, make sure your lawn is mown to ensure you don’t come back to a jungle! This is particularly important to remember for the summer months, when lawns can grow rapidly in a short period of time. Mowing the lawn and then spreading the clippings across the freshly-mowed turf can also help protect the grass while you’re away by giving it a helping hand to retain water. It might be tempting to cut the lawn short in an attempt to keep it manageable for longer, however, this can cause unnecessary stress to the grass and provide less protection against imposing weeds, so it’s best to keep it cut to a normal length.

Invest in a sprinkler timer

A sprinkler system with a timer can be a great way to ensure your garden gets a thorough watering while you’re away. Many timer systems allow for you to choose the day of the week you wish to water on, and the time and length of watering. This can be a great option for those who have plants that won’t be able to go without water for an extended amount of time. Be sure to check to make sure there are no water restrictions in place before implementing this plan, as sprinklers are often a no-no in states experiencing drought conditions.

Ask a friend, family member or neighbour to lend a helping hand

If you have someone close-by who is willing to help out with your garden while you’re away, then this can make things a lot easier. They might be happy to pop around each day (or as arranged) and give your garden ‘a watering’ and some love. You may even be able to set it up with somebody to take care of each other’s gardens, while each of you are on holiday, that way you will both know your garden is being cared for. it can also be a nice gesture to bring them back something small from your trip, to let them know you appreciate the help!

Ensuring your garden is taken care of while you’re on holiday doesn’t need to be stressful. Make sure everything is organised and sorted before you go, and you should be able to say “bon voyage” without a worry in your mind!


Need help?

Of course, don’t forget to contact your local Jim’s Mowing NZ expert! Call us now on 0800 454 654 or book online.


How to Prepare Your Lawn for the Winter Months

It’s cooling down, meaning winter is just around the corner. Now is the perfect time to prepare your lawn for the cold months ahead, but just what does that entail? We’ve got a few pointers below that can help you ensure your lawn is at its strongest and healthiest for winter and the months to follow.

Fertilise

Autumn is a great season for fertilising your lawn as it can give it a boost of strength for the colder months. Applying a quality, slow-release fertiliser in autumn can help to fortify your lawn over several months. Just be sure to ensure it is spread evenly across the lawn, and watered in well so that the nutrients can be easily absorbed.

Fix bare patches

If your lawn is looking a little patchy, Autumn is a good time to get to fixing. Many variables can cause a bare and patchy lawn, from frequent use and wear and tear to pet urine or excess shade. Before fixing the bare spots, it’s important to figure out why they occurred. For example, if there is a spot where grass has died due to trees or structures preventing it from getting enough sunlight, it may be worth re-sowing that area with more shade-tolerant grass. If the patches are caused by pet urine, it might be worth training your furry friend to use a specific area to do their business, or keeping and eye out and watering down the areas where it is done, to dilute the nitrogen content that causes grass to die. Once the issue has been identified, grass can be replaced either by transplanting runners from other areas of the garden, or by sowing grass seed in the affected area.

Collect leaves and debris

Autumn signals the shedding of leaves for many trees, which can mean more leaf litter and debris ending up on your lawn. The accumulation of leaves on a lawn can prevent it from getting much-needed sunlight. They can also become damp, leading to fungal diseases for your lawn, which is something nobody wants to have to deal with. When you notice leaves have started to build up, rake them into a pile and add them to the compost bin or use them as mulch for the veggie patch!

Get Onehunga Weed under control

Onehunga Weed is annoying, and having a lawn full of it can make the prospect of walking barefoot in the yard an unpleasant act. While they are often painfully noticed by bare feet across the country during the Summer months, these weeds begin to germinate during the colder months, making this a great time to keep an eye out for the fresh shoots and nip them in the bud before them become an issue. There are many herbicides created to be used on onehunga weed, and these can be applied during the late-autumn and early-winter months to stop the weed before it becomes painful. If you only have a few of the weeds present, and wish to avoid the use of herbicides, an alternative method is to wait until the end of winter and remove them by hand before they flower.

Mow the lawn higher

Like most plants, grass needs the sun for photosynthesis, and the longer the grass blade, the more sun is cast on the plant. Raising the mower blades in winter gives your lawn a more generous cut, allowing the grass more area to collect sun, which can lead to a healthier lawn. Colder months can also cause a lot of grasses to become dormant, so it’s likely you won’t need to mow as frequently as is needed in warmer weather.

Winter doesn’t have to mean a bad time for your lawn. With a little bit of effort you can help your lawn stay happy, healthy and strong during the winter.


Need help?

Winter is coming! Jim’s Mowing NZ is on hand to lend a hand. Contact Jim’s Mowing MZ now on 0800 454 654 or book online.


What are 4 Plants That Can Grow In Poor Soil

Everybody knows that plants grow their best in fertile soil, packed with nutrients. But what happens if your garden’s soil is less than optimal? Poor soil can mean many things. Sometimes it can refer to soil with heavy amounts of clay, while other times it can refer to sandy or chalky soil. Regardless of the reason for poor soil, the outcome is generally the same: many plants struggle to grow in it.

While you could choose to grow plants in pots, or add potting mix and manure to a section of ground, there are some plants that are able to handle poor soil for those who would rather get straight into gardening. Below we’ve listed four plants that can grow well in poor soil, to help get you started on your gardening journey.

Tomatoes

This popular salad fruit is notorious for being able to grow just about anywhere. Tomato plants make a great option for those wishing to start growing fruits and veggies in an area where soil is poor, due to their hardy nature. While hardy, they tend to have a little bit of trouble staying upright, so gently tying them to a stick or pole can be helpful in guiding them to do so.

Zucchini

Zucchinis are another food that stems from a hardy plant. If you’re a fan of this member of the squash family, then you’ll be pleased to hear that, like tomatoes, they can grow in most soil types. Zucchinis are a great plant to grow in a garden as the fruits are packed with vitamins. Just be sure to give them plenty of room, as zucchini plants have a tendency to sprawl out as they grow.

Aloe Vera

Like many succulents, aloe vera is great at thriving in poor soil. This plant requires very little water, making it a good choice for areas often affected by drought. Aloe vera plants will often produce “pups” or “offsets”, meaning you may find a few little aloe plants springing up next to your original. These can be left alone or replanted elsewhere. The extract from the leaves of aloe vera is also a popular remedy to help soothe sunburn.

Lavender

The lavender plant can grow in many poor soil types, and produces beautiful flowers on long stems. While the most common flower colour for this plant is a light purple or “lavender” colour, there are other variations available, including those with pink, blue or white blooms. Lavender flowers generally have a strong fragrance and can often help to attract bees into a garden.

This list only covers a handful of the many plants that can be grown in poor soil. While having less than optimal soil can be frustrating for the avid gardener, there are still many options available for those wishing to grow plants. Over time, it may be best to add more nutrients to the soil through compost, manure and potting mix, but in the meantime, it could be worth growing some hardy plants to satisfy the green thumb!


Of course, don’t forget to contact your local Jim’s Mowing NZ expert! Give us a call now on 0800 454 654 or book online.


What are Three Hypoallergenic Flowers That Bloom in Spring

In this article we take a look at three hypoallergenic flowers that bloom during the spring. Some of these plants need to be planted in other seasons, meaning it may be preparing for next spring before you’re enjoying their beautiful blooms.